
Quickbooks: Handling Retailer-Paid Sales Tax
 When you're an online retailer, you're almost certain to need to pay sales taxes on behalf of your customer at some point.
When might such an instance arise? Well, in my case, it could go something like this:
Situation: A customer from Oklahoma purchases a Platimum-Coated Kanooter Valve from my online store. The price of the valve is $50. For whatever reason, my checkout software doesn't collect sales tax on the purchase. As a retailer based in Oklahoma, though, I'm still liable for remitting the sales tax on the purchase.
The point here is that for online retailers, there could easily come a time when you'll need to pay some amount of sales tax on behalf of a customer. We need an easy way to handle this in Quickbooks!
Quickbooks and Sales Tax
Generally, Quickbooks makes pretty easy work of collecting, tracking, and remitting sales-tax revenues ... so long as it's the customer who's paying the tax.
If our business is paying the sales tax, though, it'll require a little more work.
Goal: We want Quickbooks to correctly calculate the Sales Tax and set it aside in our Sales Tax Payable account. We also want to be able to expense the amount of sales-tax we're paying, while at the same time making sure that our Sales Receipt or Invoice shows the actual amount our customer paid.
There are several ways to make this happen; here's how I did it.
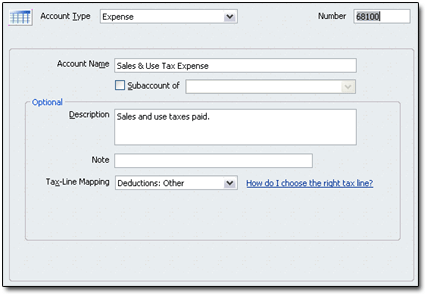
Open up your Chart of Accounts. If you don't already have an account for expensing the sales or use tax (tutorial) that your business pays, create a new Expense Account for this.
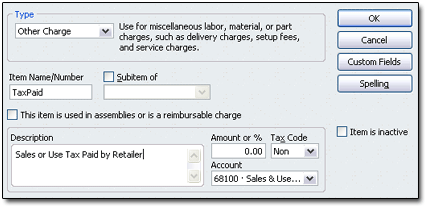
Now pull up your Item List. Create an Other Charge Item for your sales-tax expenses.
- Set it as NONTAXABLE.
- Direct it to charge against the Sales Tax Expense account you created above.
Now it's time to open up your Sales Receipt or Invoice. I'll build my invoice using the example situation above.
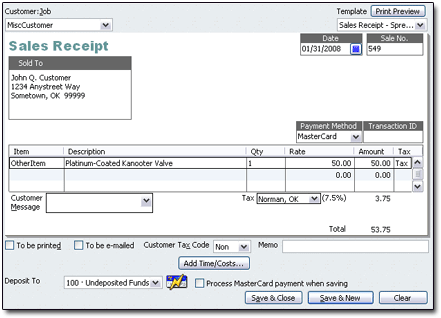
Here, John Q. Customer purchased our Kanooter Valve online, but our software billed him (and he paid) only $50. Being a resident of the same state as our business, he also should have been required to pay sales tax of $3.75, or 7.5%.
As the selling retailer, we're legally obligated to remit the sales tax for this purchase ... even if, as in this case, we didn't collect it.
On the next Item line, enter the Other Charge "Sales Tax Paid" Item you created above.
However, as shown in the image below, you will enter it as a negative amount.
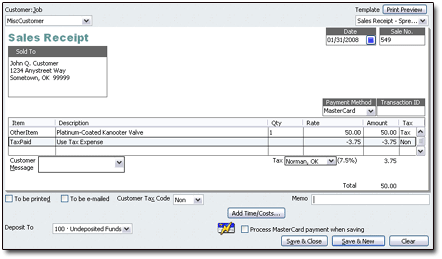
Note now that the Receipt's final Total is $50, which matches what our customer paid. This is exactly what we wanted to accomplish.
Save and close your Receipt or Invoice. In my example Receipt, the Transaction Journal would look like this:
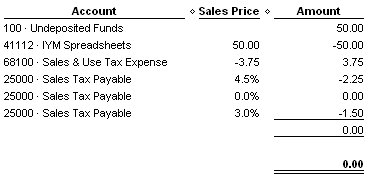
That's it! Quickbooks has set aside the correct amount of sales tax in my sales-tax payable account (Account 25000). Thanks to our Other Charge Item, that same amount will be charged to our designated Expense account (68100, in my case) for sales-tax expenditures on behalf of customers.
Not too tough at all! 