
Quicken: Handling Use Tax
 In this article, I would like to cover a few ways that Quicken users can painlessly handle and track use tax. There's nothing too complicated here, so don't run off just yet.
Because use tax (especially at the household level) isn't a terribly well-understood concept, some folks might have a need to see...
- Just what use tax is, and
- How Quicken can make tracking it a breeze.
Not to mention keeping you on the smiling side of your state's tax agencies!
Let's get started by talking a bit about what "use tax" really is.
Use Tax: A Quick Definition
(If you already know about use tax, please skip to here.)
Everyone knows about sales tax — we all pay it when we purchase goods and (sometimes) services. However, a whole lot of folks have never heard of use tax. Until a few years ago, my mother-in-law ranked high among them.
"We've been using the same accounting folks for years, and they never said anything about that," she told us. "So obviously it doesn't apply to us."
Hmmm ... not so fast. My dear mother-in-law will occasionally purchase items online — she and Amazon.com are well-acquainted — so that fact alone means she (and, apparently, her accounting crew) needs a crash course in Use Tax 101.
When purchased from an out-of-state retailer, whether by mail order, catalog, television shopping networks, radio, Internet, phone or in person, all items that would be subject to sales tax if purchased in Oklahoma are subject to use tax. Items that are subject to sales tax include books, compact discs, computer equipment, computer software, electronics, clothing, appliances, furniture and other home furnishings, sporting goods and jewelry. When an out-of-state retailer does not collect Oklahoma sales tax, the responsibility of paying the use tax falls on the purchaser.
That definition is specific to Oklahoma, of course, but many states have some variant of use-tax law on the books. Check your State Treasurer's or Tax Commissioner's website for more details.
Consider the internet: If I purchase a book or two from Amazon.com, since I live in Oklahoma, Amazon.com (based in Washington state) won't collect sales tax on the purchase. Nice savings for me, right?
Only if I'm willing to break the law.
Instead, my household is required to pay Oklahoma use tax on all items that:
- We purchased from outside Oklahoma, and
- On which we did not pay sales tax of any kind, and
- We consumed or used inside Oklahoma.
Whether I purchased the item as a normal consumer (something for my home stereo from Crutchfield.com, perhaps) or as a small business (accounting software from Intuit.com) is irrelevent. Both entities — consumer and business — are required to pay use tax if no sales tax was charged at the time of purchase.
You think Oklahoma (or any state) is going to miss out on all that sales-tax revenue just because a silly thing like the internet evolved?
Heck no.
That's why "use taxes" were implemented. They were around long before the internet, incidentally. But e-commerce has really brought use taxes to the forefront.
Quicken and Use Tax: Some Options
I can't remember when I first learned about use tax, but I know this: My wife and I buy lots of stuff online, and we have no desire to tick off our state's tax commission. So we dutifully pay our use taxes every year.
Quicken has been a godsend for this. The first method for use-tax tracking is darn simple. While not exact, it's what I've used since Day One. It's worked out fine, I suppose, though it does require a bit of time scanning through Quicken payees in order to create the report.
If your state requires use-tax payments, it may also require that such payments be made on a monthly, quarterly, or other basis. Check with your state's tax authority for details.
Reports and images may differ slightly in other versions.
Possibly the simplest way to determine whether or not a transaction is subject to use tax is by examining the transaction's payee — that is, who you paid.
If they (1) are outside your state, and (2) didn't charge you any sales tax on the purchase, then odds are decent that you now owe use tax.
On that basis, we simply need Quicken to generate a Payee Report. This will tell us how much we've paid to all our payees over any period of time we select. In my case, that'll be a year.
In your Quicken toolbar, select:
Reports → Spending → Spending By Payee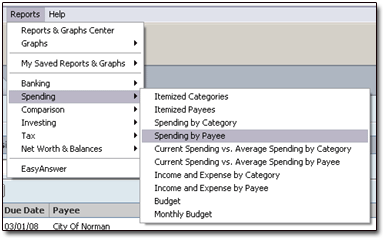
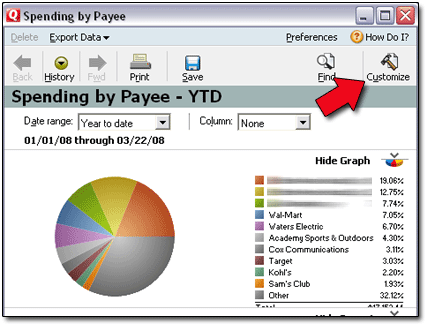
Select the CUSTOMIZE icon.
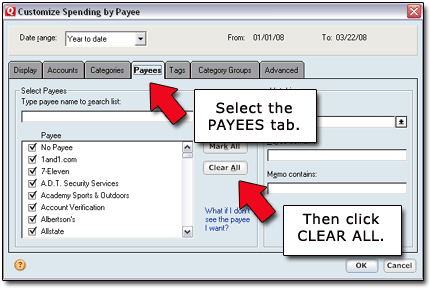
Select the PAYEES tab. Then click CLEAR ALL.
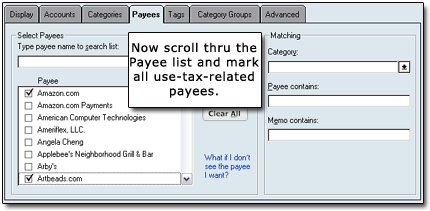
Once you've placed a checkmark beside all the payees for whose purchases you will owe use tax, click OK. The Payee Report should now generate.
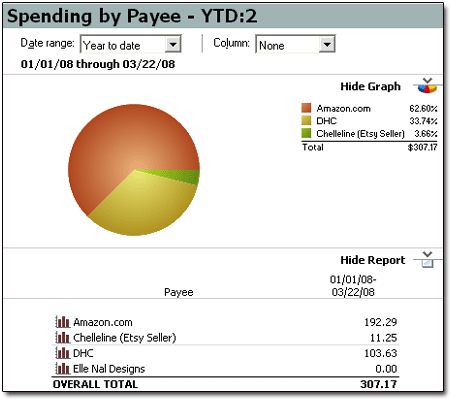
There we go: As long as the payees I selected are correct (none of them charged me sales tax on my purchases, and all of them sold me products of some sort) then I know how much use tax to remit. In this case, given my use-tax rate of 7.5%, it would be $23.04.

Beginning with Quicken 2008, users were able to not only Categorize transactions, but also to Tag them. In Quicken, tags act like keywords, and are easily added to — though not required on — any transaction. Basically they're a second way to categorize your income and spending.
And they work perfectly for getting a grip on use tax when April rolls around.
If your version of Quicken allows tagging, you probably already know that working with tags is simple. Just as with Categories, each transaction can have its own tag:

The Amazon transaction above shows a category of "Loan to Others." This is simply the Category I use when I'm purchasing things on behalf of someone else. I've also given it a tag of "Use-tax Related." I'll enter this tag for all my use-taxable transactions throughout the year.
So, for starters, you'll need to create a Tag named "Use-Tax Related" or something akin to that. Apply it to all transactions which have generated a use-tax liability. (If you're already well into the year and haven't been doing this, well, it's time to make a Command Decision. You can either:
- Go back and re-tag all necessary transactions, or
- Use Method 1 above to determine your use taxes.
I'd likely select the first option, but that's me. I'm a glutton for Quicken punishment.
Now for the fun stuff! Assuming you've tagged all necessary expense transactions, it's time to fire up another Payee Report. We'll start off just as we did above. In your Quicken toolbar, select:
Reports → Spending → Spending By Payee
Select the CUSTOMIZE icon.

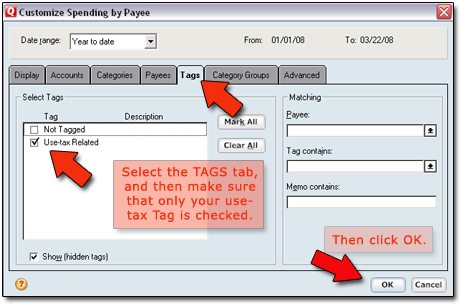
Once you've made those changes and clicked OK, your report comes up.
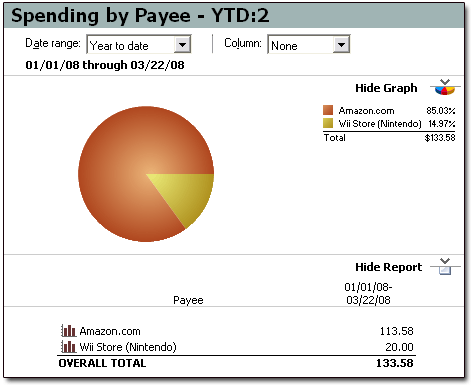
See how easy that is? My use tax liability, in this example, is $10.02 ($133.58 multiplied by my sales-tax rate of 7.5%).
Finally we'll cover what's likely the most correct way to track use taxes — from an accounting angle, at least. Handle yours this way, and accountants from here to Tacoma will show up at your door, ready for the graph-paper-and-slide-rule equivalent of Mardi Gras. (Scary, ain't it?)
From the perspective of your household balance sheet, use tax is a liability (money you owe) from the moment you make the out-of-state purchase. So, if we want to be truly correct in our accounting of it, we should show accrued use taxes as an ongoing liability account in our Net Worth statement in Quicken.
Like sales taxes, use taxes are a liability — an expense — incurred the moment you make a qualifying out-of-state purchase. They should be tracked as such, even though actual payment of the use taxes probably won't occur until the following month. Again, my Quickbooks tutorial shows an easy way to handle it in that program.
If you're going to track use taxes this way in Quicken, your first item of business is to create a new Liability account. From your toolbar, select:
Tools → Account List → Add Account
Or, if your version of Quicken has it, simply click the ADD ACCOUNT button. It's usually at the bottom of your Account Bar, on the left side of the desktop:
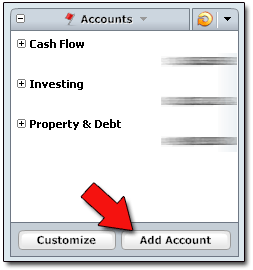
When the new window pops up, make the following selections:
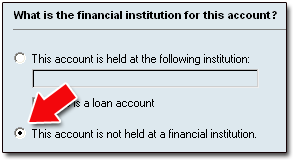
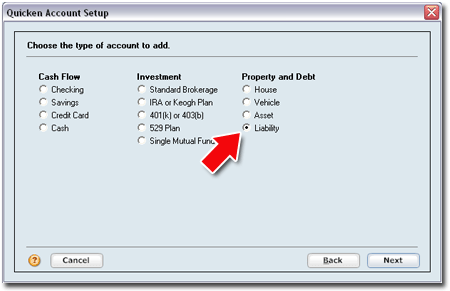

The next window then prompts for the ending balance from your last statement. Our new Use Tax Liability account doesn't have a statement, obviously. So I simply enter the last date of the previous year — in this case, since I will be entering use-tax data for 2008, I make 12/31/07 the starting date, and leave the balance at zero.
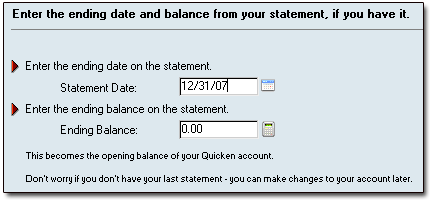
At this point, select DONE.
Quicken then asks if we wish to set up an amortized loan to be associated with this account. Select NO.
Quicken creates the new account. It appears under the PROPERTY & DEBT section of my Account Bar:
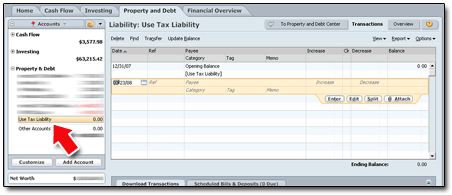
Next, we need to create a new Category for our use tax expenses. From the toolbar, select:
Tools → Category List → New
Then create your new Category. Mine's called "Use Tax" (pretty original, huh?), and it's a subcategory of "State," which is itself a subcategory of "Tax."
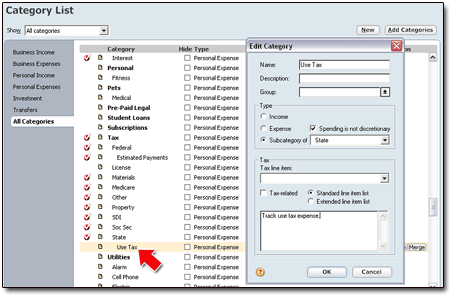
I'm now ready to start tracking my use-tax expense the right way. As an example, I'll show how to handle the use-tax entry as it relates to the Amazon purchase shown above, as well as one other online purchase.
For tracking purposes, it will be useful if we can somehow "link" the use tax transaction to the original purchase transaction. For this example, we'll presume that I've had two use-taxable transactions so far this year. One was for the Amazon purchase ($113.58) above. The other was for a $20 purchase from Nintendo.com.
Let's work with the Amazon transaction. The purchase was for $113.58, and my sales-tax rate is 7.5%. So the use tax due here is $8.52.
Rather than enter a transaction into the Use Tax Liability account by hand, I'm going to go back into the original Amazon transaction itself and change it to a "Split Category" transaction. Here's how I set up the split:
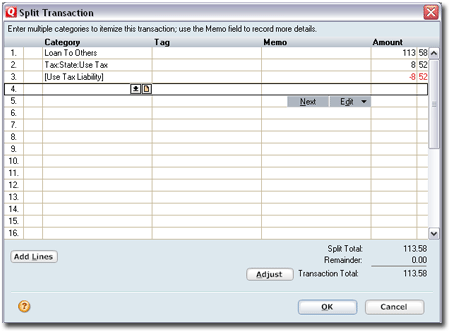
Here's what I did:
- I categorized the original amount of $113.58 as "Loan to Others," just as before.
- I entered the use tax amount of $8.52 and categorized it as such ("Tax:State:Use Tax").
- Finally, I entered the inverse amount of the use tax (-$8.52) and set it as a transfer (notice the "[" and "]" brackets) to the Use Tax Liability account.
Creating a Split Category transaction like this allows us to accomplish several things:
- We've linked the transaction in the Use Tax Liability account directly to the original Amazon transaction that created it.
- We've charged the use tax out as an expense, and categorized it as "Tax:State:Use Tax."
- We've set aside the use tax amount ($8.52) in our Use Tax Liability account.
- We've kept the final transaction total the same as what was actually charged to my credit card ($113.58).
The transaction from Nintendo.com must be modified in a similar manner. I spent $20 there, so the use tax due is $1.50 (at a tax rate of 7.5%). I'll go back to that transaction and change it to a split-category transaction also:
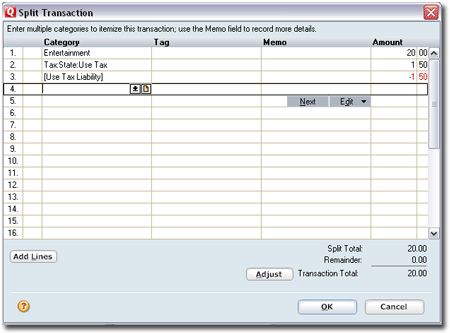
If we now take a look at the register for our Use Tax Liability account, we see:
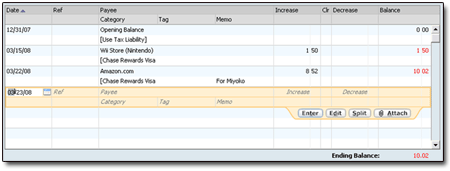
Perfect!
That's how any use-taxable transactions should be entered for the balance of the year. Now, when it's time to file and pay my use tax next year, no math (and no searching!) will be necessary. The final amount of the Use Tax Liability account on the final day of the year is what I owe!
So what happens when we make our use tax payment? How do we handle that in Quicken?
Easy. After you've filed your state taxes (including any use tax due), if you're owed a tax refund, in Quicken, simply make the deposit of your refund another Split Category transaction. Suppose my final state tax refund for 2008 is $150, which includes all my use taxes being paid. My tax refund deposit transaction would look like this:
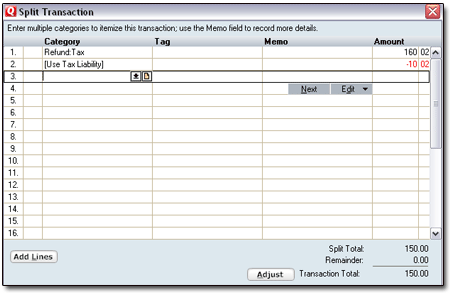
The transaction total — which is what actually reaches my bank account — is still $150. But with the Split Categories, I can adjust the amounts so that it zeroes out the Use Tax Liability account for 2008.
This leaves my Use Tax Liability account with a zero balance — except, of course, for any new use-tax transactions that might already be there for the following year.
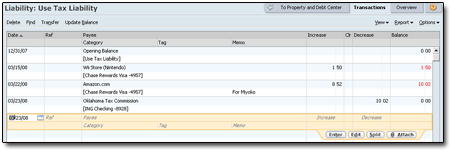
On the other hand, if I owed tax of $150 for 2008, the Split Category payment transaction would change a bit:
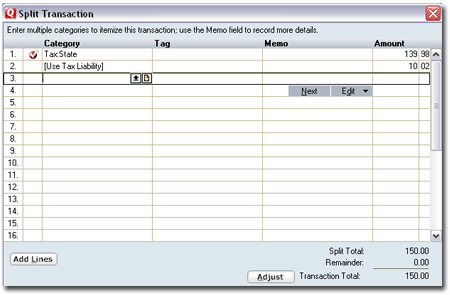
But that, too, would zero-out our Use Tax Liability account for the year. The important thing to notice is that the split amounts change depending on whether you're entering a deposit (i.e., a tax refund) or a payment (tax owed).
That's it. You can now use Quicken to track your use taxes like a pro! 