1. Handling Paypal Refunds in Quickbooks

    Back in January, I wrote a post about how I handle Paypal transactions in Quickbooks. A reader inquired as to how I handle Paypal refunds in Quickbooks, so here’s a quick run-through. Grab some popcorn, kids.

    Quickbooks And Credit Memos

    Since Quickbooks won’t allow us to record a negative-amount sales receipt or invoice, we have to create a Credit Memo when we need to issue a refund.

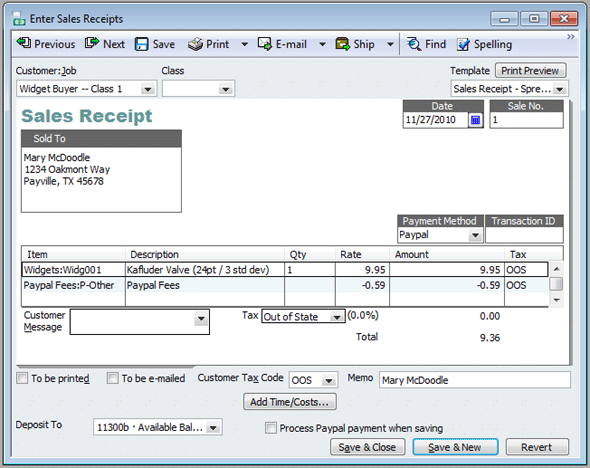
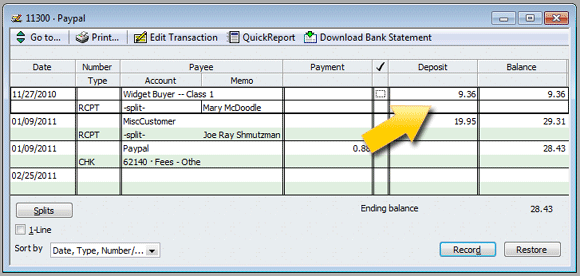
    For the purposes of this lesson, let’s assume I need to refund in full the sales receipt (pdf) I showed in my previous post. On it, customer Mary McDoodle bought a $9.95 Kafluder valve, purchased via Paypal. Accounting-wise, I absorbed the 59-cent Paypal fee inside the same receipt, setting it up as an “Other Charge” in Quickbooks. This way, the total of the sales receipt reflected exactly what I saw when I looked at the transaction in my Paypal account; i.e., a net income of $9.36:

    Paypal Register Before Refund

    Now I need to refund Ms. McDoodle. Here’s how it’s done.

    Step 1: Set Up a Credit Memo

    On my Quickbooks desktop, I’ll click the “Refunds & Credits” icon. (You could also get to this by clicking CUSTOMERS in the menubar, and then selecting CREATE CREDIT MEMOS/REFUNDS from the dropdown menu.)

    This opens up a new Credit Memo form. It’ll look much like any other sales-receipt or invoice form you might see in Quickbooks.

    Once the Credit Memo form is open, fill it out so that it matches the receipt or invoice you’re refunding. In other words, enter the same items, in the same quantities, at the same prices. This includes the Paypal fee “Other Charge” item, if you’re entering them inside each receipt the way I do.

    Let’s take a quick look back at how I entered Ms. McDoodle’s initial sales receipt:

    McDoodle Sales Receipt

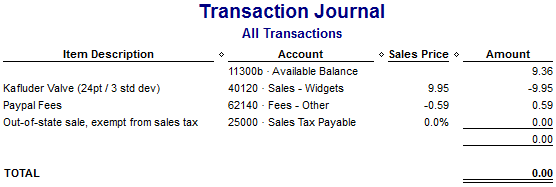
    And its accompanying Transaction Journal:


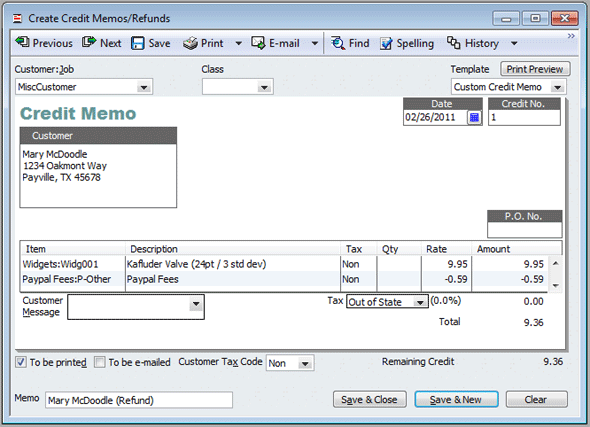
    Now for the Credit Memo. Here’s how it will look:

    McDoodle Credit Memo

    Note that I entered the same Items, quantities, and amounts in the Credit Memo as I did in the sales receipt. The Paypal fee is there because Paypal refunds it to me (the seller) when I process the refund in Paypal’s system, which I’ll do manually, outside of Quickbooks.

    When I save the Memo, Quickbook basically “reverses” what’s on it. At least, that’s how I think of it!

    Step 2: Apply the Credit Memo

    So we’ve created Ms. McDoodle’s Credit Memo. Note that nowhere in the Credit Memo form does Quickbooks ask us for the posting account (as it does in sales receipts). That’s because we could do different things with Credit Memos; we could:

    • Allow the customer to “retain” the available credit for later use;
    • Give a refund; or
    • Apply the credit to an invoice.

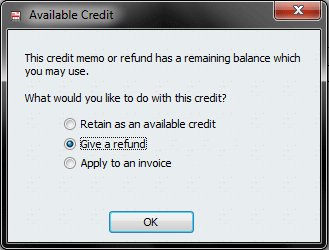
    When we save/close the Memo, Quickbooks automatically asks which of these options we want to perform. In our case, since we’re refunding the customer via our Paypal account, we’re going to opt to give a refund:

    QB Dialog: Credit Memo Action

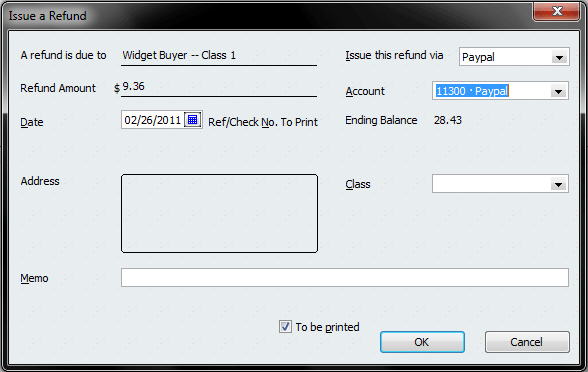
    After that, Quickbooks’ “Issue a Refund” window appears:

    QB Dialog: Issue a Refund

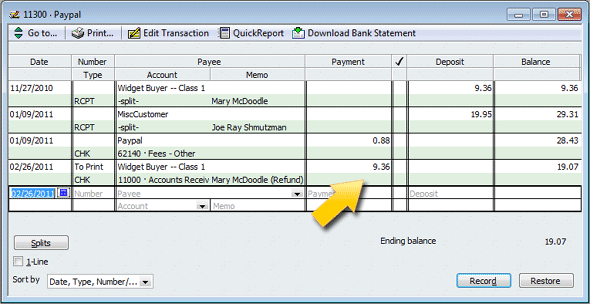
    And right there is where we’ll select the account for the refund to come from — which is our Paypal account. One more click of the OK button, and the refund is posted. My Paypal account register shows:

    Paypal Register Shows Refund

    And that’s it — we’re all done with posting the Paypal refund in Quickbooks!


  2. Handling Paypal Fees in Quickbooks

    How should I handle Paypal fees in Quickbooks?

    Boy, do I see that question appear a lot in my Intuit message-board travels! As a guy who’s been doing the web-biz thing for several years, I can tell you that — sit down for this — Paypal fees are really pretty easy to handle in Quickbooks. They can also be treated several different ways.

    (Readers should note that when I say “Paypal fees,” I consider the term to be interchangeable with Google Checkout fees and pretty much every other online-payment charge out there.)

    See Michael Sell Spreadsheets. See Michael Make Paypal Rich.

    I give away lots of free financial spreadsheets, and I sell a few, too. So Paypal (and Google Checkout!) and I get along pretty well. They allow me to sell stuff to the rest of the net-connected world, and I give them anywhere from sixty cents to a dollar for every product I sell.

    Paypal Fees: Cost of Goods Sold? Or Business Expense?

    ‘Netizens can, and do, argue this for hours on end: Are Paypal fees a “cost of goods sold?” Or are they simply an expense?

    To which I say: Meh, whatever. Either way, the fees get deducted from your small-biz revenue before you get to that place called “net profit.” Whether you classify them as COGS or as an expense, you end up with the same cash in your account.

    But there ARE a couple of scenarios to consider here which would affect how I treat my Paypal fees, accounting-wise.

    Paypal Fees on Products Bought for Resale

    If I, as a business owner, were paying Paypal fees when I bought products for resale, then I would consider those fees to be COGS. I’d account for them as such in Quickbooks, and direct them to a tax line for “Cost of Goods Sold: Other Costs” or something similar.

    Paypal Fees on Products You Sell

    On the other hand, if I as business owner were paying Paypal fees when customers bought product from me — and this is the situation I deal with on a day-to-day basis — then I would be pretty wishy-washy. These fees are realized at the time of sale, on every sale, since Paypal deducts them from my selling price when they deposit the sale revenue into my account. This makes them very much akin to a COGS.

    Despite this, I prefer to account for ALL my Paypal and Google Checkout fees as a business expense. To me, since they’re deducted from sales revenue, Paypal fees are just another form of the “merchant account fees” that brick-and-mortar retailers are so familiar with.

    My Way: Enter Paypal Fees With Each Transaction

    Because I like my Paypal register’s balance (in Quickbooks) to reflect what’s in my Paypal account at any given time, I enter all Paypal fees inside the sales receipt of the sales transactions they accompany.

    Why do I account for Paypal fees inside every sale transaction they affect? It’s because I reconcile my Paypal account the same way I reconcile every other bank or credit-card account, and I want to see each transaction show up in my Quickbooks register the same way it appears on my Paypal screen. For instance, if I sell a spreadsheet for $9.95, it appears as a credit of $9.36 in my Paypal account, with the $.59 fee already deducted.

    Thus, if I can account for the fee deduction on the same sales receipt that contains the sale itself, then my Quickbooks bank register will show the same credit of $9.36. And reconciling is a snap!

    Step 1: Set Up Your Paypal Account As a Bank Account.

    That, at least, is how I treat my Paypal and Checkout accounts. They’re set up as bank accounts, just like my business checking and savings accounts are.

    When money moves either to or from my checking account from Paypal or Google, all it takes is a simple transfer in Quickbooks. (In the QB menubar, BANKING → TRANSFER FUNDS will get it done.)

    Step 2: Create OTHER CHARGE Items for Your Paypal Fees.

    Next you’ll want to set up an Other Charge item (or items, if you want to separate your fees into certain categories, as I do) to represent your Paypal fees. In the Quickbooks menubar, choose LISTS → ITEM LIST. then click the lower-left ITEM button, and choose NEW to get started creating a new Other Charge item. Here’s an example of how mine are set up:
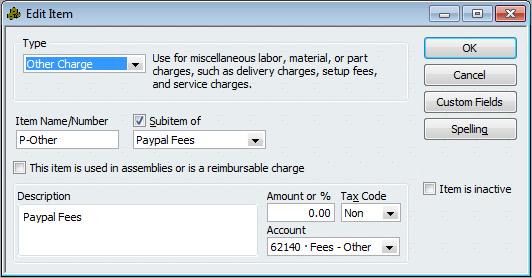
    Because I sell more than one type of spreadsheet — some are my creations, and some are created by others — I have more than one type of Paypal-fee item. This way, I can track how much I’m paying in fees for whichever spreadsheets I select.

    Step 3: Make Your Sales Receipt

    Probably the simplest way to explain this is to show you a sample sales receipt (pdf) that’s similar to what I generate.

    On that receipt, there are two items. The first, a Kafluder valve, is simply the Non-Inventory Item which the customer purchased. The second item is our Other Charge item, created above. It represents the Paypal fee of 59 cents which Paypal deducts from our sale transaction. Note that the Paypal item is entered as a negative, non-taxable amount.

    Alternate Way: Enter Paypal Fees Directly in Your Register

    In my method above, I enter the Paypal fees as an Other Charge item, and I do it inside the receipt which records the sale. Understandably, some folks prefer to have only the sale take place on the receipt. (Perhaps they send a copy of the receipt to the customer, and want it to reflect the total amount the customer actually paid.) These retailers can instead enter the Paypal fee straight into the Quickbooks register for their Paypal account.

    So, for a sample $19.95 sale to customer Joe Shmultzman (great family, the Shmultzmans), the Paypal fee of 88 cents would be entered as a transaction completely separate from the sale, and logged right in the Paypal account register itself:
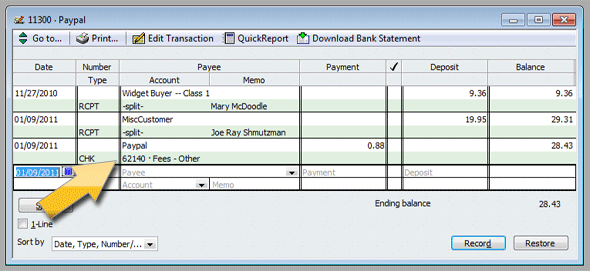
    The biggest problem with this method, to me, is that you’ll be entering a separate Paypal-fee transaction for every sale you make. That could tally up to a lot of “extra” transactions, if you sell much at all. PLUS you won’t see these transactions listed this way in your Paypal account when you view it online. And that can get a bit disorienting at reconcile time.

    Alternate, Alternate Way: Log Paypal Fees Once Per Month

    I know of some web retailers who log their Paypal fees only once per month. They do this at month’s end, or early the following month, using the Monthly Report which Paypal generates.
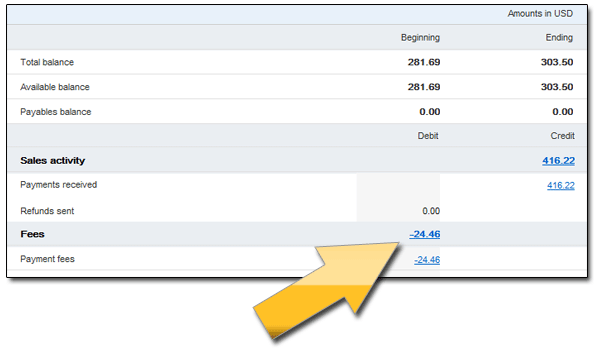
    After they run their “Monthly Report” in Paypal, they simply make a register entry for the total amount of fees deducted, expensing it to whatever account they wish.

    Personally, this method would never work for me. I check my actual Paypal balance against my Quickbooks Paypal register balance at least every day or two. When the two don’t match, I’m not a Happy Camper. Tracking fees this way would result in my online Paypal balance matching my Quickbooks Paypal balance ONLY at the end of the month.

    Sorry; no can do. I’d go nuts!


  3. Quickbooks And Web Biz: Three Years Later

    I first talked about using Quickbooks with my web business back in 2007. Now that I’ve used the software for three years, it seems a good time to rehash my thoughts on the subject.

    Quickbooks Can Do a Lot

    If you come to the table with at least some understanding of double-entry accounting, you’ll find that Quickbooks is pretty easy to operate. For the price of, say, $150, Quickbooks Pro is a full-featured offering. Its accounting backbone alone (it can handle bank subaccounts!) is probably worth that price. Add to that the ability to create and customize invoices and receipts and so on, and the hundred-bucks-plus price tag doesn’t phase me a bit.

    I say this even though I customarily upgrade my version of Quickbooks every couple of years. (Quickbooks Pro 2007 was my first QB installation, followed by QB Pro 2009.) Such upgrading every other year is the same process I follow with Quicken, which handles my personal finances.

    But There’s This “Reliability” Thing …

    While my experience with Quicken has, since the mid-1990s, been quite glitch-free, I can’t say the same for my work with Quickbooks. Since I began using it in 2007, I’ve experienced data-file corruption at least twice. In Quickbooks, when your datafile gets corrupted, it is a very bad thing.

    This last occurrence (mid-year 2010) was so severe that I was forced to start from an entirely blank slate, accounting-wise, on January 1 of 2011. This was because I could not backup my datafile (complete with business records from 2007 through 2010) due to the corruption, AND the corruption somehow reached back through all my retained backups. As if that wasn’t bad enough, Quickbooks regularly shut itself down when I’d exit certain menus or lists. When just making it back to Quickbooks’ home desktop becomes an adventure, you know the software has serious limitations.

    And talk about fun: For the last few months of 2010, I was forced to use Quickbooks 2009 Pro on my old Dell laptop, entering records for the remainder of 2010 and using it to complete our 2010 taxes. On my newer Toshiba laptop, I installed Quickbooks 2010 Pro; I began using that on January 1, 2011, carrying over only reconciled ending balances from December 31 of the previous year.

    (I do take some amount of pride in the fact that my QB2009 datafile is so corrupted that Quickbooks 2010 can’t even open it. Nice, huh?)

    In any case, my three-years-and-two-full-data-disasters experience convinces me that Quickbooks is absolutely NOT reliable enough for anything more than the smallest of small-biz endeavors. It also convinces me that keeping a zeroed-out, accounts-and-items-only copy of your Quickbooks datafile — a fresh-start datafile, in other words, with no transactions whatsoever — is an absolute necessity. (Current users of Quickbooks who’ve not experienced such problems should note that it took me one full day, morning to night, to recreate my chart of accounts, item lists, and so on … and that was WITH me having the rare luxury of being able to keep my old company file open on one laptop, while building the new, blank file on another, AND importing from Excel when possible.)

    Where To Go From Here?

    Well, I’ll be using Quickbooks Pro 2010 for the foreseeable future. I’ve given some thought to trying out Sage Peachtree, but my comfort level with Quickbooks just won’t let me steer clear of it … yet. At least I can always make QB do what I want it to do, accounting-wise. Plus, I’ve invested no small amount of time in learning its ins-and-outs and various functionalities. The thought of “going newbie” with an entirely new software set, learning it from the READ-ME file on up, doesn’t enthuse me AT ALL at this moment.

    Down the road, though … who knows? One more encounter with datafile corruption, and I might just head for the Quickbooks exits.